Memory Tile
With the skeleton code in place, this step looks at the first element of the game, the memory tile. It’s the visual building block that consists of an underlying filled rectangle background, the icon image. Later steps add a covering rectangle that acts as a curtain.
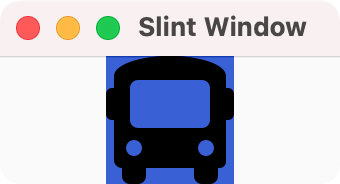
You declare the background rectangle as 64 logical pixels wide and tall filled with a soothing tone of blue.
Lengths in Slint have a unit, here, the px suffix.
This makes the code easier to read and the compiler can detect when you accidentally
mix values with different units attached to them.
Copy the following code into ui/appwindow.slint file, replacing the current content:
Copy the following code into ui/appwindow.slint file, replacing the current content:
Copy the following code inside of the slint! macro, replacing the current content:
component MemoryTile inherits Rectangle {
    width: 64px;
    height: 64px;
    background: #3960D5;

    Image {
        source: @image-url("icons/bus.png");
        width: parent.width;
        height: parent.height;
    }
}

export component MainWindow inherits Window {
    MemoryTile {}
}
This exports the MainWindow component so that the game logic code can access it later.
Inside the Rectangle place an Image element that
loads an icon with the @image-url() macro. The path is relative to the location of ui/appwindow.slint.
Inside the Rectangle place an Image element that
loads an icon with the @image-url() macro. The path is relative to the location of ui/appwindow.slint.
Inside the Rectangle place an Image element that
loads an icon with the @image-url() macro.
When using the slint! macro, the path is relative to the folder that contains the Cargo.toml file.
When using Slint files, it’s relative to the folder of the Slint file containing it.
You need to install this icon and others you use later first. You can download a pre-prepared
Zip archive to the ui folder,
If you are on Linux or macOS, download and extract it with the following commands:
cd ui
curl -O https://slint.dev/blog/memory-game-tutorial/icons.zip
unzip icons.zip
cd ..
If you are on Windows, use the following commands:
cd ui
powershell curl -Uri https://slint.dev/blog/memory-game-tutorial/icons.zip -Outfile icons.zip
powershell Expand-Archive -Path icons.zip -DestinationPath .
cd ..
This unpacks an icons directory containing several icons.
Compiling the program with cmake --build build and running with the ./build/my_application opens a window that shows the icon of a bus on a blue background.
Running the program with npm start opens a window that shows the icon of a bus on a blue background.
Running the program with cargo run opens a window that shows the icon of a bus on a blue background.